One of the most challenging things I have encountered on Saleblazers is creating seamless tiling textures that simultaneously use baked maps. Neither task is simple on its own and they’re inherently contradictory to each other.
On top of that, we also need a material offset for readability and variance; for example, wooden planks that are abundant in our game’s western district. For a game like ours with a large variety of different floor materials, defining a workflow for a task this complex is crucial.
In this dev log I will lay out out my process of creating our wooden floorboards material.
It won’t be too in-depth and will act more as a general pipeline guide.
References
The first step is to gather reference material. I found examples of the look I was going for in my mind, as well as some fun stylized floorboards to serve as further inspiration.
Floors in our game are simple 6-sided cubes. Props have exaggerated geometry, so we have to match that with exaggerated painted detail in the floor textures.

Texturing and Modeling
I selected the reference photograph which best represented what I wanted to make. With this picture:
- Play with the texture scale until you’re happy with the sizing in relation to characters/props.
- Find 3 floorboards in a 1 x 1 UV space that are the closest to the effect you want to create.
- Use offset filters on your reference to make the ref photo seamless and tilling.
- Import the image into Maya to use as a photo reference.
- Model a cuboid to represent each plank.
- Duplicate the cuboid and place it where the plank opposite ends. This is harder to explain than it is to show so hopefully this diagram illustrates what I am talking about.

7. Use the multi cut tool with shift held down, encircling the point of the overhang. If it’s not exact, don’t worry. You can select the edge loop and hold down ‘v’ and snap it to the edge of the Floor Piece Model.
8. Do this for all of the planks then delete the overhang excess. You should have 6 separate pieces at this time. Move and attach the smaller pieces to the ends of the larger pieces keeping the loop edges as you do so. These are now your base for low poly baking.

The UV unwrapping layout looks something like this. Be sure to layout your UVS using the full width of the UV space but following the layout of how you had the plank pieces before combining. The UV should reflect the ref image more than the low poly base at this point.

Note: I had an extra loop down the center of the lowest planks as I thought I would need to split half at the top of the UV space and half at the bottom, but I was able to create the look I wanted without needing to do this so disregard this loop.
A tip for laying out the edges is to align them with the ends of the planks then flip them so that the touching edges are aligned but the body of the edge is now reversed and overlaid over the top surface of the plank. This step is particularly important as the sides of the Floor piece model will probably be seen while the player is building so it needs to look attractive.

9. Take your low poly base into a sculpting program and sculpt your plank detail. I used a lot of swirl patterns and did create geometry detail to the ends so that the geo is projected into 2D. It will be subtle but will look better than a straight drop off for the plank. Make sure to keep a version of your UV’ed Planks base though.

Note: you will need to re-topologize the base planks in the program to have a uniform surface before sculpting. The edge loops will mess with your poly distribution.
10. The next step is baking. Don’t try to bake the high poly onto the flat cuboid floor model, since you will lose the crevice detail and may cause artifacts. Instead if you go back to the low poly plank base to bake each plank individually with a shared material, transferring that material to the in-game model produces cleaner results with a variety of generated maps to play with in a texturing program.
Note: The overlapping UVS aligned to the edges of the top faces of the boards will need to be shifted to another 1-1 space before baking to avoid artifacts in baking. There should be no overlapping UVS on the planks used to bake but you can have overlapping UVS on your final in-game model.
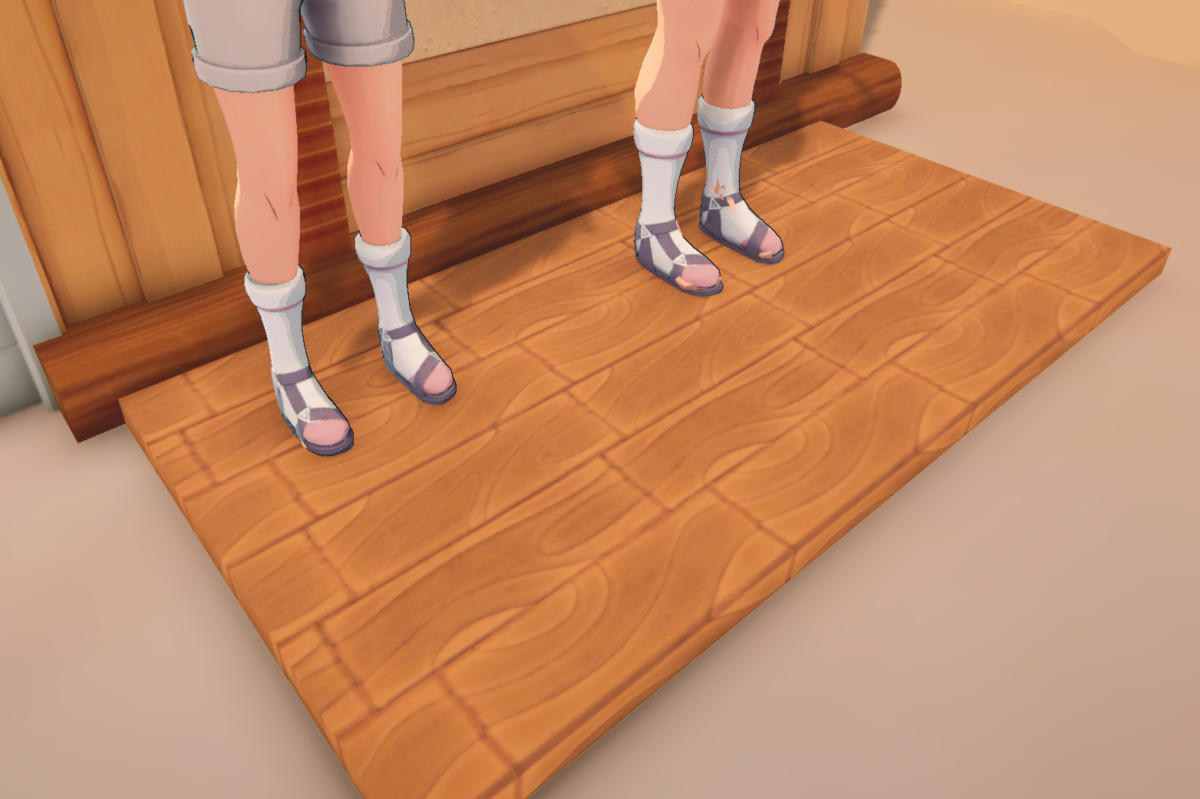
Final Result

The final result looks like this, which I feel is a balanced look and expresses exactly what type of material the floor pieces are without any geometry.
The key to this process is accurate UVs, so double check that the orientations are correct, all edges are aligned, and mirrored pieces have exact matches. You should be able to apply a checker material and read the numbers correctly on both sides; one side should not be backwards.
I hope this quick overview serves as a good resource for others.